Hi everyone, thanks for sticking with me while we take this crazy whirlwind of deciding to move and being in a new house within five months. It has been so crazy around here that all we are managing to do is unpack and clean. Shortly before we moved I started back at work part-time and Braxton started going to a summer camp as well, so that has just added to the crazy.
I wanted to take a few minutes to show you guys a small update that we made to the front of the house since we moved in. If you saw the announcing post here, then you saw that there was a crazy bush with a mind of it's own in the front. Well, after 3 months with the sellers not touching anything it was a jungle everywhere outside.
This is what we moved into, noticed the actual tree growing within inches of the foundation at the right of the house and the half dead bush in front of the entrance.
Seriously, seeing that was so overwhelming. It bummed us out to see how the sellers didn't do any maintenance at the house because we kept up with our house for our buyers. Here is a better view of the side of the house that leads to the front steps and entrance area, with the lovely half dead bush.
But there is nothing that can be done about it! So we had Luis' dad drop his trailer off and Luis got to work. After a few hours of hard labour in the summer heat, Luis managed to make our house appear. We cut down all of the trees and bushes that were on the right side of the house, as well as trimmed the large bush at the far left of the house.
Guys! It looks so much better! It's amazing the difference that can be made when you remove (or transplant, if possible) the wrong type of plant to help landscape your house to accent it's best features. The tree and bush that we removed were making the house seem much smaller than it was, as well as making the house too heavy compared to the garage. It didn't balance very well at all.
We are still a LONG way from being done, but the house already looks so much better and we love being able to actually look out the windows at the front. In the spring I have quite a bit of transplanting to do both in the front yard and the back yard, as well as buying some new plants to replace the ones we had to remove.
I can't wait to extend the gardens and add some texture to the front garden, and well as remove all the crazy rocks that are hidden everywhere. Can you believe all those rocks in the picture above were hidden by that giant dead-ish bush? It looks like Luis has some more back breaking work to do in the spring.
Like I said, it was a small makeover that made a huge impact. I can't wait to start designing and share some more progress with you guys!
Kerby
Hello everyone! Happy Friday to you all.......and I am so late posting this! We've been running around trying to get so much done that I ran out of steam this week. I managed to get about two thirds of my room painted over the weekend before I ran out of paint. We tried a new brand and it does not cover as well as my beloved Behr paint, so stay tuned for an update! You know, once I buy more paint, find a day to send the kids out to their grandparents and have time to finish the last wall. But it will happen soon because I cannot stand looking at two different paint colours in one room.
Anyway, with March here it's time to start thinking about Easter. I know most people are getting ready for St. Patrick's Day and I'm not going to lie to you guys... I completely forgot about it. I was thinking that Easter was the next big thing to decorate for, oh well.
I made a quick Easter sign up to pop onto a table upstairs, just to add a little pop of colour to celebrate that spring is on the way. Which it is, even if it goes from summer to winter in two days. I used some leftover particle board and craft paint from my stash. I have used the oak veneered particle board all over the house (kid-friendly coffee table inserts; triforce tray update; bathroom drain cover), and my love for it is not running out.
I gave the whole thing a quick sand and painted the whole board with my tester of Irish Mist by Behr. I figured the layout and then I traced out the letters and pictures with pencil, though I would have liked the board to have been a bit shorter looking back. (Sorry the pencil is so hard to see in these pictures!!)
Then I used my craft brushes to paint the letter and pictures in blocks of colour, starting and finishing each colour in turn. You can see above that I started out with the bunny in yellow, then remembered that I don't really like yellow and changed it in the end. The craft paints were either used straight from the bottle or mixed with the Irish Mist to make them lighter.
I like to have all of my supplies out and available, and I use little condiment containers with lids (purchased from a local store) to help keep the paint from drying out in case I need to use more. No matter how good you think you are or how much you measure, you will probably never get the colours to match when mixing different batches. It's better to waste a bit and have some leftover than repaint everything because you can't get the colours to match later.
I probably repainted things at least twice before I was happy with the lettering and the bunny. Not going to lie, I gave up with the eggs. They were so hard to paint and really do look much better in person. It wasn't until I started editing the pictures that I realized the eggs look a little off. Again, oh well.
Sorry for the short and sweet post guys, this was planned for Tuesday and I just remembered that I forgot to write it. I wish I could say that big things are getting done, but it's pretty much all maintenance stuff that we have slacked on lately.
But at least I have an Easter sign, right? It's more Easter decor that I usually have, and bonus points because Braxton thinks it's pretty cool. I'm sure Kaley would like it if I would let her chew on it, which I won't. Have you guys started to put up any spring or Easter decor?
Kerby
Hello everyone and happy Friday! The weekend is here, and I am excited to get some much needed painting done. Painting is a hard job without kids being around, add a helpful toddler or two and it's basically an exercise in patience. The kids are going for a visit at their grandparents for the day tomorrow and I plan on getting a ton of stuff done. Plan being the key word.
Today I want to show you guys an easy way to cover an ugly drain pipe that can be seen when you have an open vanity in your bathroom. It is actually a really easy solution and won't take too much time or effort.
Back when we finished the basement renovation a few years ago, which included our half bathroom, we ran out of steam and left a lot of the decorative stuff for later. The bathroom sat like this for a long time and I got sick of looking at the drain pipe every time I was in there. It's not exactly the nicest thing to look at and always made the bathroom feel dirty, even though it wasn't. Maybe I'm alone in that feeling, but I thought that covering the drain while keeping it accessible would look much better.
So I asked Luis to make a cover for the drain using scrap wood from the basement renovation. He used some of the thin plywood that we have used in tons of projects (Tray update; kid safe coffee table inserts) and two pieces of 1x2 scrap wood. I told him I was going to be painting it and it would be mostly hidden so it didn't have to be beautiful.
It's nothing to call home about unfinished and sitting by itself but I knew that it would work perfectly to cover that ugly drain. So to recap, it's literally five pieces of wood that are nailed together to make a screen. We did a test fit to make sure that it wasn't too big and that it covered enough of the drain without taking up too much room. The shelf that it sits on is the main storage place for the vanity, so really don't want to lose that.
Already better. After a light sanding I grabbed the leftover wall paint (Turtle Dove by Behr) and gave it two quick coats. I didn't fill the gaps or anything crazy because I knew this was going to be almost completely covered once in place. Once dry I just put it around the drain, leaving a little clearance around the pipe. I didn't want it to touch the pipe, just sit in front of it. Then I put our basket full of extra toilet paper rolls back in it's place.
It looks so much better to me, almost like the drain is in the wall. And this keeps the drains fully accessible in the future so no worry about anything permanent to prevent a plumber or us from doing any work. It was such a quick and easy way to cover the ugly drain, and I love how much cleaner the bathroom looks.
Kerby
Hello everyone and happy weekend! How quick is this year going? I can't believe it's almost the end of February, it's like I blinked and a month flew by. But I'd rather a winter month disappear quickly than a summer month. Fingers crossed we only have two or so months left until we start to see spring.
Back in January I shared an alphabet matching game for Valentine's Day (which you can find here), and I mentioned that I had leftover Bristol board that I had a plan for. Well today I am sharing what you can make with a small piece of Bristol board and a few minutes of your time.
I thought that numbers would be a good compliment to the alphabet, though Braxton is becoming such an old pro at these I might have to get creative and start with some different learning tools.
I traced the square ten times onto the Bristol board, then traced the star inside the square in a pattern. I used my trusty paint pens in blue, green and purple. Then I used a stencil to add the number to the board and the pieces of foam in black paint pen.
For this matching game I used foam shapes that I had on hand from a project that went bust a few years ago, and I thought they would work perfectly. I mentioned using foam pieces with the alphabet matching game as well. Ideally I would have had ten of one shape, but alas I only had six. So I got creative and made the game a little more challenging, hopefully. At least it looks pretty.
Braxton loved this one too and again needed no direction. He had a little more fun bending the foam shapes and adding them to the puzzle, and some of the shapes got quite ruffled. It is such a great exercise that gets their minds working, even if they know how to count to ten.
This was another inexpensive project that took zero money and little time, and it gives Braxton something new to play with and think about. And once Kaley gets a little older she can start to play with it as well. The foam will stand up to little hands so much better than paper or card stock, so definitely go for foam if you have the option.
This is a great way to kill some time during the winter months where everyone gets so restless, including mom and dad. Give this a try and let me know how it turns out!
Kerby
Linking to:
Tatertots and Jello - BFF Link Party 2/17/17
eighteen25 - Show and Tell #15
Gingersnap Crafts - Wow Me Wednesday #287
Two Chicks and a Mom - Funtastic Friday 2/23/17
Hi guys, please excuse the cheesy title. This was a hard one to come up with, and "family heart tree" sounds just as silly, so might as well go cheesy or go home I guess. I don't know guys, I'm kinda just winging it here.
In the spirit of trying to decorate for each holiday, even a little bit, I decided that I wanted to have a tree of sorts that expressed our family. I had a bunch of salt dough hearts leftover from the magnets that I made, and really didn't need another two dozen magnets so I thought these would work perfectly for the tree (these were the ones that I put string holes into before baking).
I choose most of the small hearts, a few medium hearts and two large hearts. Then I painted them various shades of pink and one heart I painted gold. I used plain old acrylic paint for this, but I can't tell you the colours because I mixed them all except the gold. And using my handy-dandy paint pens (if you can't tell already I love these things) I added initials and dates to some of the hearts. Once I was happy with how they looked I did a coat of Mod Podge on both sides and used fishing line to hang them up.
I used the large hearts for Luis and I's initials, the medium hearts are the kids initials and birth years. The one gold heart is the year that we got married, which was another medium heart. And the smallest hearts are the animals initials, because they are a part of our family too. There are a few hearts without anything on them too, just to balance the tree and make it not so busy.
Ideally I would have liked the branches to be a little fuller but these were off of our rose of Sharon bush in the backyard because we have no other trees with small branches around. They worked great and were the perfect size, I also used fishing line to attach these together in the vase.
Can you imagine having your kids help you paint these hearts and add things that they love to it? This is a great family craft to do together so that you can teach your kids that Valentine's Day (even though it's commercialized) is about love, not candy and valentines.
You don't even need to use salt dough for the hearts, you could use clay from a craft store or even card stock. This is as easy as you want to make it. This would also be great for a thankful tree around Thanksgiving using things that the kids are thankful for on leaves.
I can't wait to add to our tree as the kids get older and can add their own things to it, even if they are silly. Right now it just shows off special dates and initials of some very important people in this house.
That's it for today guys, come back soon and check out what else is new and what I'm actually getting accomplished. If you guys do make these I'd love to see them.
Kerby
Linking to:
Two Chicks and a Mom - Funtastic Friday #113
Ginger Snap Crafts - Wow Me Wednesday #286
Hello everyone, and what a beautiful Monday. Yes, I just said that but it's true because every Monday that passes gets us a little closer to spring. I love the winter for myself (in a way), but hate it for the kids. They just get so stir crazy, I cannot wait until we can start to go play outside again.
Today I want to share my Valentine's day shelf, which I have never done before. I usually decorate this shelf that we have in the living room for most seasons and always forget to share it with you guys. So I decided it was time to start showing you little things like this so that maybe you can be inspired. You don't need to decorate your whole house from top to bottom every holiday, a shelf or table can make you feel festive without overdoing it.
My shelf is pretty simple, and some of the items stay year round because I like how they look. Usually the candle holder, books and frames stay in some variation on the shelf and I add new elements for the upcoming holiday or season.
I used red bead garland inside the candle holder (with a pink candle) and a red and gold flower ornament to add some pops of red. Both of which are from my Christmas decor, showing that you can reuse elements in different seasons! I made this printable to pop in the frame, which is nice and simple. I have to ease myself into the holiday guys. Plus, it's something that Luis and I signed our notes with in high school. Memories. I will share this at the bottom in case you would like it as well.
The dried roses are actually from our first anniversary and stay out somewhere all year round. I love looking at them and remembering that they were from a special day. This makes the shelf feel more like Valentine's day to me because it's showing off things that are what this holiday is about. Then I added some heart garland to my empty frame, which was leftover paper from the heart alphabet matching game from a few weeks ago.
I used my trusty paint pens to make some arrow art on card stock to put in a smaller frame to finish the shelf. I love how this turned out, and will probably add it somewhere else in the house. I just drew what would fit into my frame and what I thought looked nice. Anyone can make a little art for a frame this way, don't be afraid to try.
A few simple accents to help add a little Valentine's day to our household, and all of it contained on a shelf. Not too shabby, definitely something that can be done anywhere by anyone. And you can see I didn't go too over the top with the colours, just some pops of bright red and gold.
And here's the printable for anyone who's interested.
Well that's it for today. Thanks for dropping by again and come back because I have some great stuff coming up.
Kerby
Linking to:
eighteen25 - Show & Tell #13
Ginger Snap Crafts - Wow Me Wednesday #285
Two Chicks and a Mom - Funtastic Friday #113
Hi guys, I have another Valentine's day related post for you guys. I know, what is happening?!? Like I have said previously, I'm trying to get into the spirit of each holiday from now on. Since I have yet to do this holiday, I have so many things to make or try.
Today I want to share some Valentine's day magnets that I made using salt dough. If you've never used salt dough before you're missing out. It's probably the easiest thing to make and work with, just make sure that everyone knows they are not cookies. Mistakes have been made in this house.
First you need to make the salt dough, and you should have everything on hand.
2 cups of flour
1 cup of salt
1 cup of warm water
Mix the flour and salt together, add the warm water and mix the ingredients together until a ball of dough forms. Roll out to any thickness, though thinner does work better.
I would aim for roughly 1/4 inch, or less if you can manage it. Once you have a thickness you are happy with use cookie cutters in whatever shape you want. I used a few different sizes of hearts. You can keep re rolling the scraps until you can no longer salvage enough to cut your shapes.
If you are planning on using any in a hanging craft, use a straw to make string holes. You can see below that I made holes in roughly half of the hearts, just poking near the top with a straw until the dough is removed into the straw. These will be used in a later craft, stay tuned!
Bake at 250 degrees for 1-2 hours. I baked mine for an hour and a half then turned the oven off and left the hearts in for the last half hour while the oven cooled. They probably could have used the full two hours, but watch for the bottoms getting burned.
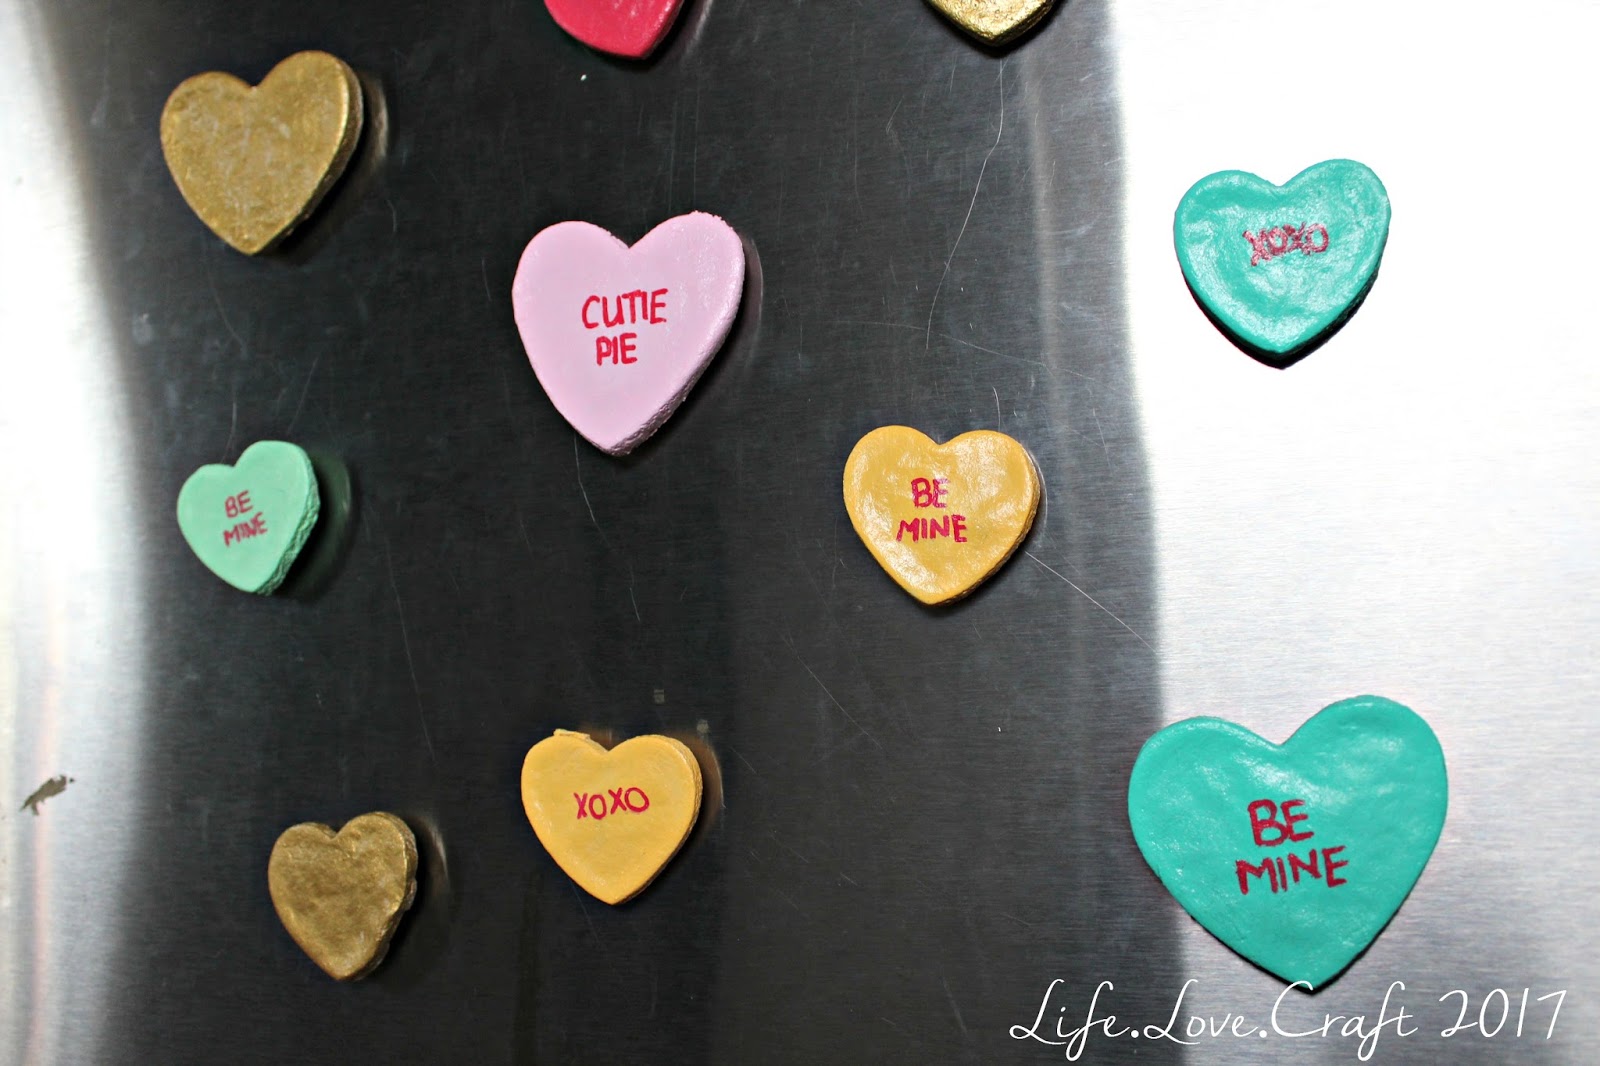
Let sit overnight and decorate however you like. I used some pastel colours for this craft as well as some paint for the other craft, planning on making conversation heart magnets. It ended up taking roughly three coats per side. I like to make sure that the salt dough is completely sealed with paint.
I'm sure you'll be very surprised to hear that the next step was to grab my red paint pen and write out the sayings on the magnets. I know, I'm as shocked as you are. I choose to stick with the basic sayings that you see on most conversation hearts, but you could get creative.
Next is a coat of Mod Podge on all sides and letting it dry. I used high gloss because that's what I had on hand, but I think matte might look better. Once dry glue magnets to the backs and let dry.
I didn't take any pictures of this step, but use tacky glue and larger magnets to support the hearts. I used hot glue because I didn't have tacky glue, don't do this. Especially if you are planning on these being gifts. These are just for us, so I deemed it safe enough. Plus, I couldn't get out to buy tacky glue.
These are pretty cute and would make fantastic gifts for grandparents or other family members. You can have the kids do thumb prints and date them as a great keepsake, and this is something you might want for your own fridge. Or you know, let them get creative and draw or write what they want.
A nice and easy craft, just how I like them. The whole craft took about a day including baking and drying time, with about an hour worth of effort. We will be making these again in the future, maybe next year, when the kids want to participate. I live for cute keepsakes like this.
Have you guys ever used salt dough to make magnets, or anything else? I'd love to see and get new ideas.
Kerby
Linking to:
Ginger Snap Crafts - Wow Me Wednesday #284
Two Chicks and a Mom - Funtastic Friday #112
eighteen25 - Show and Tell #7
Hello and welcome to another post featuring Kaley and her first birthday...hopefully you can survive one more post on this topic. I know it's a lot, but I want to share some pictures of Kaley's cake smash in case anyone at home wants to try this.
For Braxton's cake smash pictures we hired a photographer, and I love them so much but they were very expensive (with a capital e). When you are off on maternity leave versus staying at home without any leave, things like this become a luxury. So I decided to try to take my own pictures for Kaley's cake smash. I know they aren't as good as professional pictures, but I think I'll keep the $400+ and call this good enough.
I kept the theme for her cake smash the same as her birthday party, and actually used almost all the same decorations. I threw a pink plastic tablecloth on the ground with a large peach-pink piece of fabric over top. I hung a white paper tablecloth on the wall and taped paper stars to the backdrop. To cover the two tablecloths meeting I used tissue poms along the wall and outer edges of the area. Add a pink cake with star sprinkles and gold star cake toppers and you have yourself a cake smash area.
You can see how all of the stars and tissue poms were used at Kaley's party here. I think that this worked well, but the area seemed much larger before I tried to take pictures. Next time, or if I had to do this again I would add more of a side to the backdrop so that I could take pictures on angles. Braxton just sat and played with the cake for his, but Kaley was running everywhere. It was difficult to get pictures of her because I had to constantly run her back into place and try to take a picture before she took off again. Thanks goodness for Luis.
Kaley did not like touching or eating the cake, but she sure wanted to run away with the tissue poms and stars. The cake toppers were much cooler than the cake too, and eventually had to be put up so that we could get her to pay attention to the cake. Silly girl. It's going to pretty much be pictures from now on, so enjoy our little goofball!
This was a lot of work to get the decorations and area ready, but so worth it. I love being able to look back at these and remember how little they were and how much they have grown. I'm a very sentimental person and things like this (and throwing birthday parties with tons of decorations) make me happy and feel like I will have a fond memory to look back at. As well as something for the kids to look back at as well.
That's it folks, the last time you will here the words "first birthday" on this blog. And I promise no more birthday post for at least 11 months, maybe 12 depending on how crazy life is. I saved the best picture for last, enjoy.
Kerby
Linking to:
Naptime Creations - Great Things to Make for Kids 1/31/17
Ginger Snap Crafts - Wow Me Wednesday #284
eighteen25 - Show and Tell #7