Hello everyone and happy Sunday! Hopefully everyone got to sleep in and was able to spend some quality time with family, friends or just relaxing. Can you do any of that for me too? Our kids are slowly boycotting sleep and they have me outnumbered. People with more than two kids, I give you props. Go you.
Today I want to share a recipe that I found on Pinterest and I thought would be perfect to use up some cream cheese that's best before date was quickly approaching. I have never made cookies with cream cheese but was definitely intrigued and thought it was worth a try.
Cream Cheese Chocolate Chip Cookies (original recipe)
1/2 cup butter, softened
1/4 cup cream cheese, softened
3/4 cup brown sugar, packed
1/4 cup white sugar
2 tsp. vanilla
1 egg
2 1/4 cups flour
1 tsp. baking soda
2 tsp. cornstarch
1/4 tsp. salt
2 cups chocolate chips
1. Cream butter and cream cheese together until smooth. Add sugars and beat until fluffy and well combined. Then add vanilla and egg and beat until combined. Scrape the sides of the bowl occasionally, and between additions.
2. In a separate bowl combine the flour, baking soda, cornstarch and salt. Add dry ingredients to wet ingredients until combined. I found the dough didn't come together very well, it was especially dry.
3. Add in chocolate chips and stir until distributed without over mixing. I used semi-sweet chocolate chips but would definitely recommenced milk chocolate or M&M's like the original recipe. I just used what I had on hand. Chill dough for 30 minutes.
4. Preheat oven to 350 degrees and scoop dough onto cookie sheet with an ice cream scoop. I had to flatten them a little because they baked weird when I let them drop. Bake 8-10 minutes, then let rest on the cookie sheet for an additional 2 minutes.
I have to say, they looked fantastic from the original recipe, but mine did not turn out as nice. They did not spread out or crisp up at all, staying pretty much how they were dropped. And they were "soft", but extremely dry and crumbly. Not what I'm looking for in a cookie, especially a chocolate chip cookie. When I think of soft I think chewy, which I know is different, but that's what I associate with soft. These were not chewy, at all.
I want to chock this up to baker error, because they really didn't turn out that great. There was not much sweetness to the cookie, which could have been because I used a semi sweet chocolate instead of a milk chocolate. There wasn't a lot of sugar in the recipe, so pretty sure a chocolate swap would have made a big difference in the taste. I have found that some recipes make the dough a little less sweet to accommodate the chocolate in the recipe. How many times can I say chocolate in one paragraph? Holy guys.
But I can't figure out why they ended up dry and crumbly. Baker error must have been my issue. Even my tried and true freezer solution didn't work guys. They were even worse straight from the freezer, so I ended up tossing them. If I'm going to eat a cookie, it's got to be a good cookie. No half way on that.
If you have no idea what I'm talking about with my "freezer solution", just toss the cooled cookies in the freezer for a few days and then try one straight from the freezer. Guys, seriously this will change your life. The right cookie recipe will go from good to super-amazing once it come out of your freezer. You can find the cookies I recommend for this here: Chocolate Cake Cookies; Mint Chocolate Pudding Cookies and Chocolate Coconut Balls.
Has anyone made cream cheese cookies before and had them turn out? I am still really interested in the idea of cream cheese in cookies, but now I'm a little shy of trying again. Please share if you have!
Kerby
Linking to:
eighteen25 - Show and Tell #16
Hello, hello. Guys, I really feel like I am finding my groove with getting stuff done! Not to jinx myself but I feel like everything is finally balancing out and I am getting a touch more free time do crafts and bake. Now that Kaley is on the move she is constantly finding things to get into and this keeps her pretty occupied. And Braxton may just be the easiest kid ever, so that means more free time for Mommy!!
Recently we grabbed some store bought pie crusts because I was feeling lazy and didn't want to make pie dough for turkey pies. Silly me should have just made the pie dough because when I opened the store bought crusts they were in pieces. Literally pieces of the pie crust were no longer attached and were floating freely in the box.
So I ended up making dough for the turkey pies and was not impressed while doing it. Not wanting to waste these store bought crusts, I headed over to Pinterest to find a way to use these and I stumbled onto things called hand pies. Why have I not heard of these before!?! Completely intrigued I found a recipe to try from Cooking on the Front Burners.
Apple Hand Pies (original recipe)
2 pkgs. store bought pie crust (2 crusts in box)
2 1/4 cups apples, peeled and chopped very small
1 1/4 tbsp flour
1/4 cup white sugar
1/8 tsp nutmeg
1/2 tsp cinnamon
1 egg (for egg wash)
1. Set out dough to thaw to room temperature. This doesn't take too long, maybe 30 minutes (you can see some of the missing crust below and all of the cracks). At the same time preheat oven to 425 degrees.
2. Toss apples with flour in a medium bowl until coated. Stir in sugar, nutmeg and cinnamon. I used quite a bit of cinnamon because that's how we like our apple pie. Set the apple filling aside.
3. Take dough out of the pie shell and flatten on a floured surface, like your counter. Use a cookie cutter to cut circles in the pie dough, mine was a 2-inch circle and way too small. I switched to a 3-inch heart halfway through but it was still too small. Re-roll the scraps to use as much of the dough as you can, making sure that you have an even number.
4. Place dough on cookie sheet lined with parchment paper. Next is placing the apple filling onto the dough. I was able to get roughly 2 teaspoons on my dough circles, where the original recipe managed 2-3 tablespoons. I was able to get 2 1/2 teaspoons in my hearts. Place another dough circle over top and pinch edges together. You may have to remove some of the filling to get the dough to pinch together. Once together use a fork to flute the edges and poke the top with the fork.
5. Beat egg with 1 tablespoon of water to make an egg wash and brush the tops of the pies. If you want you can top with coarse sugar, which I did with my hearts and recommend. Bake for 10 - 11 minutes, adjusting for the size of your hand pies.
Once they have cooled, roughly an hour, you can enjoy. Now I have this labelled as a baking fail because we found these to be crust heavy. I know this is because of the size of hand pies that I made, but there was barely any filling. If you like your pies like that, you are crazy. For us, they just didn't hit the mark.
These hand pies definitely need to be made with a biscuit cutter, at least 4 inches like the original recipe to get the crust to filling ratio a little more even. But that being said, the process worked beautifully, the size of the dough was 100% the problem. I also want to note that I had a ridiculous amount of filling leftover. I followed the original recipe and used 4 cups of apples, which I think would still be too much because I used four crusts where they used two.
We ended up using some vanilla ice cream leftover from Braxton's birthday and these went from a 5 out of 10 to at least an 8. So yummy with ice cream, the extra crust didn't seem so overwhelming. I will definitely be trying the recipe again with a larger cookie cutter and will let you guys know if they come out any better. Maybe even with a different filling, I saw that some people use jam. I am even more intrigued.
Have you guys ever had or made hand pies? Or like me had never heard of them before? They really are a great way to use broken store bought pie crusts, or even extra dough from pies.
Kerby
Linking to:
eighteen25 - Show and Tell #15
Gingersnap Crafts - Wow Me Wednesday #287
Two Chicks and a Mom - Funtastic Friday 2/23/17
Naptime Creations - Create, Link, Inspire 2/27/17
Hello everyone and happy weekend! How quick is this year going? I can't believe it's almost the end of February, it's like I blinked and a month flew by. But I'd rather a winter month disappear quickly than a summer month. Fingers crossed we only have two or so months left until we start to see spring.
Back in January I shared an alphabet matching game for Valentine's Day (which you can find here), and I mentioned that I had leftover Bristol board that I had a plan for. Well today I am sharing what you can make with a small piece of Bristol board and a few minutes of your time.
I thought that numbers would be a good compliment to the alphabet, though Braxton is becoming such an old pro at these I might have to get creative and start with some different learning tools.
I traced the square ten times onto the Bristol board, then traced the star inside the square in a pattern. I used my trusty paint pens in blue, green and purple. Then I used a stencil to add the number to the board and the pieces of foam in black paint pen.
For this matching game I used foam shapes that I had on hand from a project that went bust a few years ago, and I thought they would work perfectly. I mentioned using foam pieces with the alphabet matching game as well. Ideally I would have had ten of one shape, but alas I only had six. So I got creative and made the game a little more challenging, hopefully. At least it looks pretty.
Braxton loved this one too and again needed no direction. He had a little more fun bending the foam shapes and adding them to the puzzle, and some of the shapes got quite ruffled. It is such a great exercise that gets their minds working, even if they know how to count to ten.
This was another inexpensive project that took zero money and little time, and it gives Braxton something new to play with and think about. And once Kaley gets a little older she can start to play with it as well. The foam will stand up to little hands so much better than paper or card stock, so definitely go for foam if you have the option.
This is a great way to kill some time during the winter months where everyone gets so restless, including mom and dad. Give this a try and let me know how it turns out!
Kerby
Linking to:
Tatertots and Jello - BFF Link Party 2/17/17
eighteen25 - Show and Tell #15
Gingersnap Crafts - Wow Me Wednesday #287
Two Chicks and a Mom - Funtastic Friday 2/23/17
Hello everyone, and Happy Valentine's day. We didn't really do anything special as far as treats go for the kids this year. Braxton doesn't like anything sweet and we are trying to give Kaley a minimum amount because of that. So we kinda skipped the goodies part this year, and I;m sure their teeth will thank us. But remember, tomorrow all the candy will be half off! Best part in my books.
I decided to write about how well the flooring that we put down in the basement hallway has held up over the last two years. Two of the top posts on this blog are how we spray painted our counter tops and how well our spray painted counter tops have held up. Since this is a very similar situation, I thought it would be worth sharing.
In case you can't check out the original post about the hallway, here's a reminder of the hallway when we finished our basement renovation in 2014.
We used peel and stick vinyl flooring hoping that this would be a better solution to carpet and tile. We did not want carpet because our Bernese mountain dog (Motley) likes to lay at the bottom of the stairs and we knew that it would be a gathering spot for hair. As well as the cats spend time in the laundry room and tend to leave us hairballs in this area too. So carpet was out, and we didn't want tile because we thought it would be too cold on our feet. This is similar to what we purchased.
Well after just over two years, I have to say we are very sad that the floor did not last at all. The flooring has been destroyed between the largeness of Motley and it being a very high traffic area. The kids and I spend about half of our day downstairs, and when they go to bed Luis and I hang out in the rec room.
As you can see there are sections all over the flooring where the facing of the flooring has peeled right off. There are quite a few spots in this one area at the bottom of the stairs, which is Motley's favourite place to sleep when we are in the basement. His nails just rip the facing right off the base and then the traffic rips it further.
When this happens we usually just cut the raised portion off the floor, if it doesn't fall right off itself, and hope that it doesn't rip any further. Usually it does stop ripping any further, but we have put a remnant carpet (from the rec room) where Motley lays hoping to stop anything further.
And this is just a portion of the missing flooring. There is some in the bathroom and a large portion in the doorway to the laundry room. We figure the traffic of us going in and out started a rip and the cats finished it off one night when they were bored.
After all of this my opinion is that this flooring is either not meant to withstand a 120 pound dog continuously walking on it or not great for areas with high traffic. I would definitely opt for tile if you have the option, it is not that much more expensive and will probably last you a much longer time.
We will be ripping this out and replacing it with tile when we can because the tile flooring will be an improvement as far as we are concerned. This flooring is cold on the feet as well, so that's not an issue anymore. And it looks terrible now with all these rips, so anything would be an improvement.
Hopefully I was able to help you guys make a more informed decision regarding peel and stick vinyl flooring. If someone has had a great experience I would love to know, maybe we chose wrong or installed it wrong (though we followed the instructions perfectly).
Kerby
Linking to:
eighteen25 - Show and Tell #14
Ginger Snap Crafts - Wow Me Wednesday #286
Two Chicks and a Mom - Funtastic Friday #114
Tatertots and Jello - BFF Link Party 2/17/17
Naptime Creations - Create, Link, Inspire 2/27/17
Hi guys, please excuse the cheesy title. This was a hard one to come up with, and "family heart tree" sounds just as silly, so might as well go cheesy or go home I guess. I don't know guys, I'm kinda just winging it here.
In the spirit of trying to decorate for each holiday, even a little bit, I decided that I wanted to have a tree of sorts that expressed our family. I had a bunch of salt dough hearts leftover from the magnets that I made, and really didn't need another two dozen magnets so I thought these would work perfectly for the tree (these were the ones that I put string holes into before baking).
I choose most of the small hearts, a few medium hearts and two large hearts. Then I painted them various shades of pink and one heart I painted gold. I used plain old acrylic paint for this, but I can't tell you the colours because I mixed them all except the gold. And using my handy-dandy paint pens (if you can't tell already I love these things) I added initials and dates to some of the hearts. Once I was happy with how they looked I did a coat of Mod Podge on both sides and used fishing line to hang them up.
I used the large hearts for Luis and I's initials, the medium hearts are the kids initials and birth years. The one gold heart is the year that we got married, which was another medium heart. And the smallest hearts are the animals initials, because they are a part of our family too. There are a few hearts without anything on them too, just to balance the tree and make it not so busy.
Ideally I would have liked the branches to be a little fuller but these were off of our rose of Sharon bush in the backyard because we have no other trees with small branches around. They worked great and were the perfect size, I also used fishing line to attach these together in the vase.
Can you imagine having your kids help you paint these hearts and add things that they love to it? This is a great family craft to do together so that you can teach your kids that Valentine's Day (even though it's commercialized) is about love, not candy and valentines.
You don't even need to use salt dough for the hearts, you could use clay from a craft store or even card stock. This is as easy as you want to make it. This would also be great for a thankful tree around Thanksgiving using things that the kids are thankful for on leaves.
I can't wait to add to our tree as the kids get older and can add their own things to it, even if they are silly. Right now it just shows off special dates and initials of some very important people in this house.
That's it for today guys, come back soon and check out what else is new and what I'm actually getting accomplished. If you guys do make these I'd love to see them.
Kerby
Linking to:
Two Chicks and a Mom - Funtastic Friday #113
Ginger Snap Crafts - Wow Me Wednesday #286
Hello everyone, and what a beautiful Monday. Yes, I just said that but it's true because every Monday that passes gets us a little closer to spring. I love the winter for myself (in a way), but hate it for the kids. They just get so stir crazy, I cannot wait until we can start to go play outside again.
Today I want to share my Valentine's day shelf, which I have never done before. I usually decorate this shelf that we have in the living room for most seasons and always forget to share it with you guys. So I decided it was time to start showing you little things like this so that maybe you can be inspired. You don't need to decorate your whole house from top to bottom every holiday, a shelf or table can make you feel festive without overdoing it.
My shelf is pretty simple, and some of the items stay year round because I like how they look. Usually the candle holder, books and frames stay in some variation on the shelf and I add new elements for the upcoming holiday or season.
I used red bead garland inside the candle holder (with a pink candle) and a red and gold flower ornament to add some pops of red. Both of which are from my Christmas decor, showing that you can reuse elements in different seasons! I made this printable to pop in the frame, which is nice and simple. I have to ease myself into the holiday guys. Plus, it's something that Luis and I signed our notes with in high school. Memories. I will share this at the bottom in case you would like it as well.
The dried roses are actually from our first anniversary and stay out somewhere all year round. I love looking at them and remembering that they were from a special day. This makes the shelf feel more like Valentine's day to me because it's showing off things that are what this holiday is about. Then I added some heart garland to my empty frame, which was leftover paper from the heart alphabet matching game from a few weeks ago.
I used my trusty paint pens to make some arrow art on card stock to put in a smaller frame to finish the shelf. I love how this turned out, and will probably add it somewhere else in the house. I just drew what would fit into my frame and what I thought looked nice. Anyone can make a little art for a frame this way, don't be afraid to try.
A few simple accents to help add a little Valentine's day to our household, and all of it contained on a shelf. Not too shabby, definitely something that can be done anywhere by anyone. And you can see I didn't go too over the top with the colours, just some pops of bright red and gold.
And here's the printable for anyone who's interested.
Well that's it for today. Thanks for dropping by again and come back because I have some great stuff coming up.
Kerby
Linking to:
eighteen25 - Show & Tell #13
Ginger Snap Crafts - Wow Me Wednesday #285
Two Chicks and a Mom - Funtastic Friday #113
Hi guys, I have another Valentine's day related post for you guys. I know, what is happening?!? Like I have said previously, I'm trying to get into the spirit of each holiday from now on. Since I have yet to do this holiday, I have so many things to make or try.
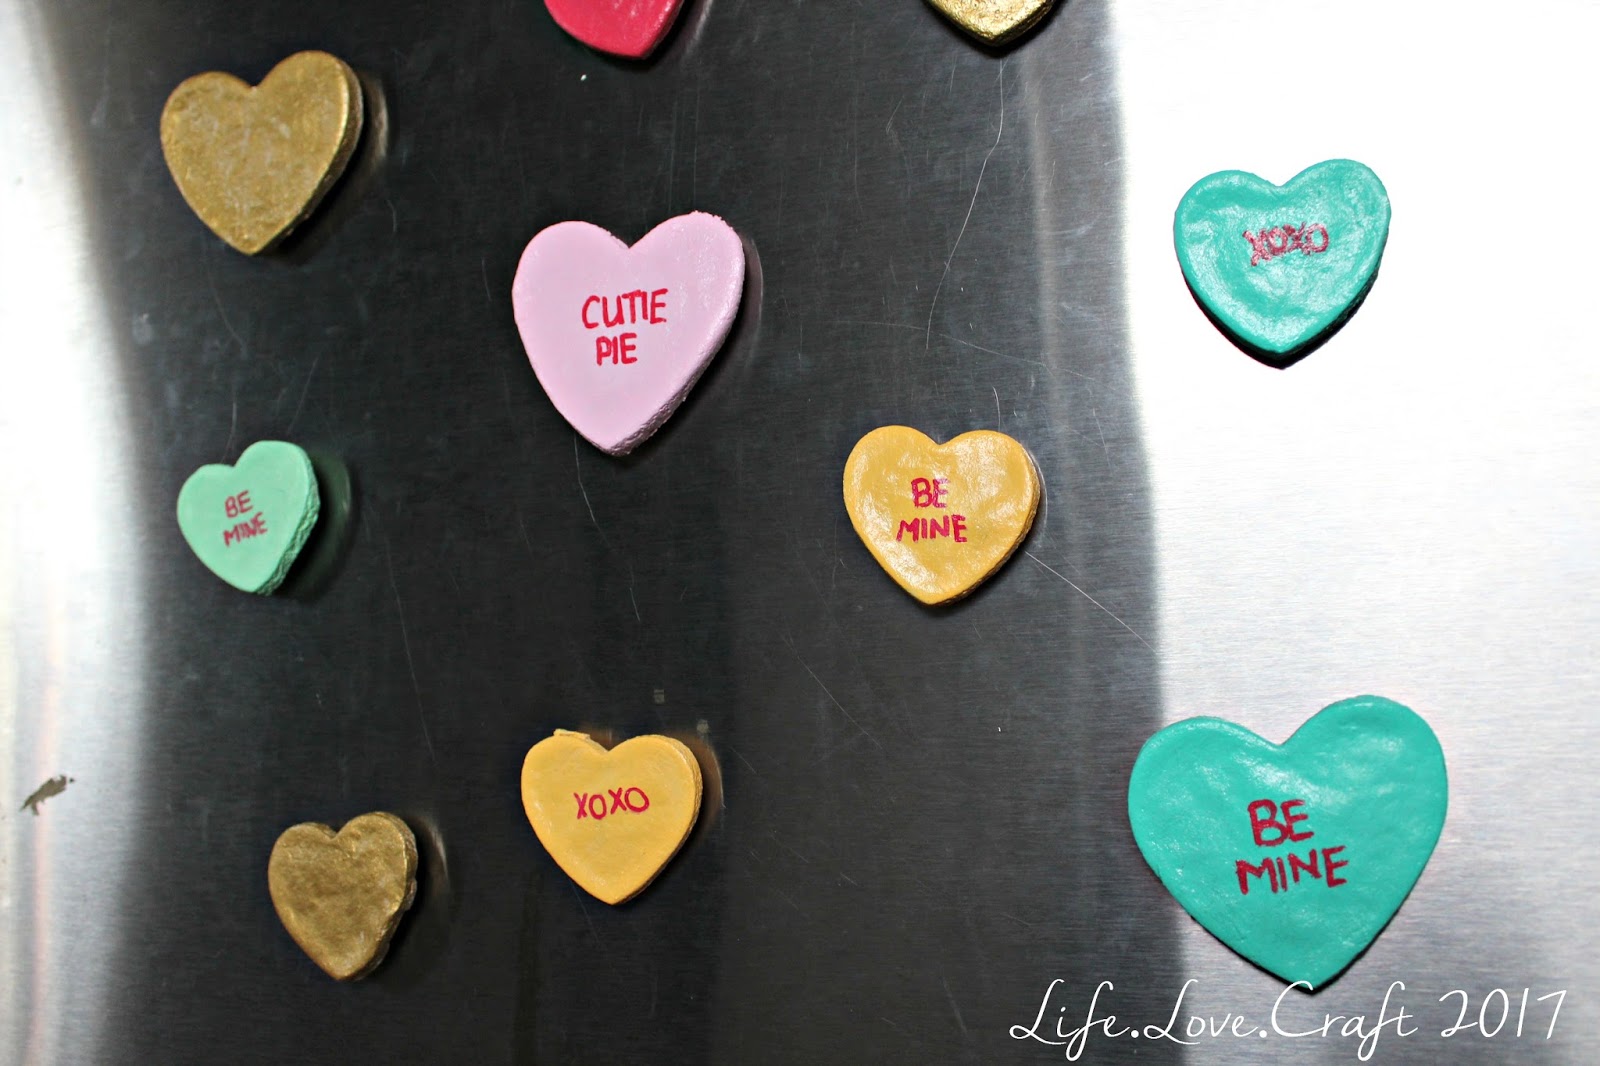
Today I want to share some Valentine's day magnets that I made using salt dough. If you've never used salt dough before you're missing out. It's probably the easiest thing to make and work with, just make sure that everyone knows they are not cookies. Mistakes have been made in this house.
First you need to make the salt dough, and you should have everything on hand.
2 cups of flour
1 cup of salt
1 cup of warm water
Mix the flour and salt together, add the warm water and mix the ingredients together until a ball of dough forms. Roll out to any thickness, though thinner does work better.
I would aim for roughly 1/4 inch, or less if you can manage it. Once you have a thickness you are happy with use cookie cutters in whatever shape you want. I used a few different sizes of hearts. You can keep re rolling the scraps until you can no longer salvage enough to cut your shapes.
If you are planning on using any in a hanging craft, use a straw to make string holes. You can see below that I made holes in roughly half of the hearts, just poking near the top with a straw until the dough is removed into the straw. These will be used in a later craft, stay tuned!
Bake at 250 degrees for 1-2 hours. I baked mine for an hour and a half then turned the oven off and left the hearts in for the last half hour while the oven cooled. They probably could have used the full two hours, but watch for the bottoms getting burned.
Let sit overnight and decorate however you like. I used some pastel colours for this craft as well as some paint for the other craft, planning on making conversation heart magnets. It ended up taking roughly three coats per side. I like to make sure that the salt dough is completely sealed with paint.
I'm sure you'll be very surprised to hear that the next step was to grab my red paint pen and write out the sayings on the magnets. I know, I'm as shocked as you are. I choose to stick with the basic sayings that you see on most conversation hearts, but you could get creative.
Next is a coat of Mod Podge on all sides and letting it dry. I used high gloss because that's what I had on hand, but I think matte might look better. Once dry glue magnets to the backs and let dry.
I didn't take any pictures of this step, but use tacky glue and larger magnets to support the hearts. I used hot glue because I didn't have tacky glue, don't do this. Especially if you are planning on these being gifts. These are just for us, so I deemed it safe enough. Plus, I couldn't get out to buy tacky glue.
These are pretty cute and would make fantastic gifts for grandparents or other family members. You can have the kids do thumb prints and date them as a great keepsake, and this is something you might want for your own fridge. Or you know, let them get creative and draw or write what they want.
A nice and easy craft, just how I like them. The whole craft took about a day including baking and drying time, with about an hour worth of effort. We will be making these again in the future, maybe next year, when the kids want to participate. I live for cute keepsakes like this.
Have you guys ever used salt dough to make magnets, or anything else? I'd love to see and get new ideas.
Kerby
Linking to:
Ginger Snap Crafts - Wow Me Wednesday #284
Two Chicks and a Mom - Funtastic Friday #112
eighteen25 - Show and Tell #7